
A four-step installation guide covering wall-mount, furniture-mount, and floor-mount methods, with anchor selection by wall type, pull-force testing, and code-compliance notes for hotel operators.
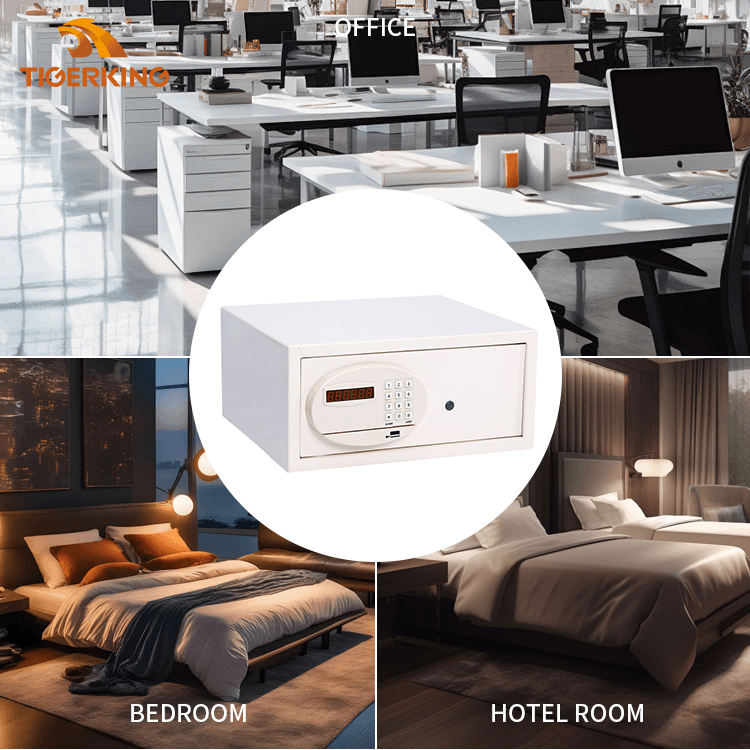
The off-white electronic hotel safe — designed for wall-mount hotel safes, furniture-mount in closets, or floor-mount for heavier units.
In this guide
1.TL;DR — Pick the Right Mount in Under a Minute
2.Why Mounting Method Matters for Hotel Operators
3.Pre-Install Checklist: Tools, Wall Type, and Safe Spec
4.Wall Mount: Drywall, Concrete, and Wood-Stud Anchoring
5.Furniture Mount: Safes Inside Closets and Cabinets
6.Floor Mount: Heavy Safes and Concrete-Slab Anchoring
7.Post-Install: Pull-Force Test, Code Compliance, and Liability Notes
8. 12-Step Installation Quick Reference
9.Frequently Asked Questions
TL;DR — Pick the Right Mount in Under a Minute. Concrete or masonry walls: use wedge anchors. Wood studs behind drywall: drive lag screws into the stud. Steel-stud drywall: use Toggle or Snaptoggle bolts and consider downgrading to furniture-mount. Hollow partition walls with no stud: furniture-mount inside a fixed cabinet. Safes heavier than 25 kg empty or larger than 40 liters: floor-mount into a concrete slab. Every safe must be anchored; an unbolted safe under 50 kg can be carried out in under a minute and voids most guest-property insurance claims. Document the install with a pull-force test, a torque log, and a 30/90-day re-check.
Why Mounting Method Matters for Hotel Operators
An in-room hotel safe is only as secure as the anchor that holds it. A high-end electronic lock with audit trails and RFID access is meaningless if a thief can lift the safe off the dresser and walk out of the room. For hotel operators and the contractors who install their safes, mounting method is not a finishing detail — it is the difference between a safe that deters theft and one that merely looks like it does. Understanding the three main mounting options, and the wall types each is suited to, is the foundation of a defensible safe installation program.
There are three mounting methods used in hotels today: wall mount, where the safe is bolted directly into the wall behind or above a piece of furniture; furniture mount, where the safe is bolted inside a wardrobe, closet, or cabinet; and floor mount, where the safe is anchored through its base into the concrete slab below. Each method has a different load profile, a different installation skill requirement, and a different interaction with the building's structure. Picking the wrong one for a given wall type leads to anchor pull-out, drywall shear, or in the worst case a safe that detaches during a break-in attempt and exposes the hotel to liability.
Insurance carriers pay close attention to safe installation because the claim outcomes diverge sharply based on whether the safe was properly mounted. The American Hotel & Lodging Association (AHLA)publishes operational guidance on guest-property protection that explicitly references fixed-location in-Room Safes; while the AHLA guidance does not mandate a specific anchor type, it does require that the safe be installed in a manner that is consistent with the manufacturer's instructions and that the installation be documented. TheNational Fire Protection Association (NFPA) provides complementary guidance on how safe installations interact with sprinkler coverage and compartmentation, which matters in hotel fire-code compliance. Both sets of guidance point in the same direction: the safe must be fixed, the fix must match the wall type, and the install must be recorded.
The rest of this guide walks through pre-install audit, the three mounting methods one at a time, and the post-install verification that closes the loop. For operators who are also thinking about the procurement decision — which safe to buy in the first place — the considerations in this guide apply broadly, whether you are working with electronic keypad locks, RFID card locks, or biometric models. For background on the broader operational case for in-room safes and how they fit into hotel security programs, our earlier guide on why in-room safes matter walks through the guest-experience and liability case for installation in the first place.
Pre-Install Checklist: Tools, Wall Type, and Safe Spec
Before any drilling happens, three things have to be confirmed: the wall type behind the planned mount, the loaded weight of the safe once installed, and the absence of hidden infrastructure in the drilling zone. Skipping any of these three checks is the single most common cause of failed installs.
Identify the wall type. Use a stud finder to locate wood or steel studs, and a small pilot drill or a multi-scanner to confirm what is behind the drywall facing. Concrete and solid masonry walls feel solid to a pilot drill and produce grey dust; wood studs produce wood shavings; steel studs resist the bit and produce a metallic squeal. Hollow partition walls with no stud behind the planned mount location are common in older hotel renovations and are a red flag — they cannot support a wall-mounted safe without relocating the safe or changing the mount method.
Confirm the loaded weight. The loaded weight is the empty safe weight plus the typical contents. Industry assumptions for hotel guest safes run from a few hundred grams (passport, jewelry, small electronics) up to about 5 kg for a guest who packs a laptop. Use a 10 kg load assumption as a conservative planning figure. The anchor and the wall together must support the safe's empty weight plus the 10 kg load, with a safety factor of at least 4 for sustained loads and higher for dynamic loads.
Scan for hidden infrastructure. Before drilling any anchor hole, scan the wall for electrical wiring, plumbing, fire sprinkler piping, and HVAC ducts. A multi-scanner with AC voltage detection is the minimum tool; for hospitality construction, a borescope inspection through an existing outlet opening is the gold standard. Hitting a sprinkler pipe or a 240-volt line is a serious safety incident and a much bigger problem than relocating the safe by 30 centimeters.
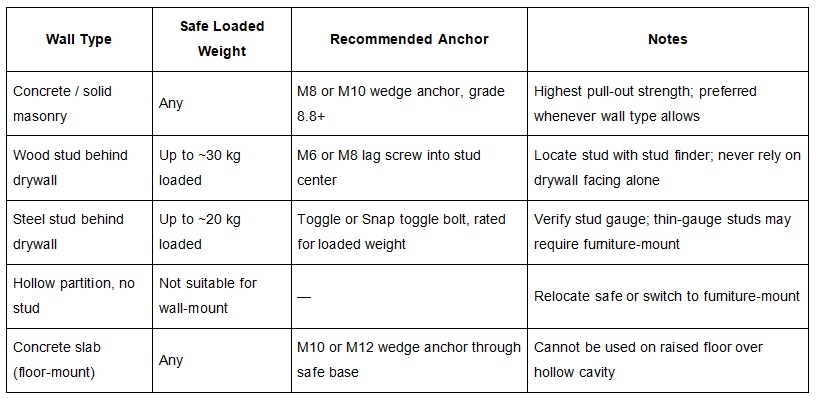
The table below summarizes the anchor selection by wall type and safe weight. Use it as a quick reference before opening any tool case.
Wall Mount: Drywall, Concrete, and Wood-Stud Anchoring
Wall mount is the most common installation method in hotels because it keeps the safe out of the floor zone, leaves the floor clear for housekeeping, and lets the safe live behind a piece of furniture or above a desk. The catch is that wall mount is also the method with the widest range of wall conditions, and the wrong anchor for the wrong wall is the most common installation failure.
Concrete and solid masonry walls.Use a hammer drill with a carbide-tipped masonry bit sized to the anchor diameter. Drill to the depth specified by the anchor manufacturer, usually 50 to 70 mm for an M8 wedge anchor. Clean the hole with a wire brush and compressed air; dust left in the hole reduces anchor grip by 10 to 20 percent. Insert the wedge anchor with the nut and washer pre-installed, then torque to the manufacturer's rated value (typically 25 to 35 Nm for M8). Do not substitute plastic expansion anchors for Hotel Safes; they are not rated for sustained load.
Wood studs behind drywall. Locate the stud center using a stud finder, mark the four mounting hole locations within the stud width (typically 38 mm for a standard 2x4 stud), and drill pilot holes sized for the lag screw root diameter. Drive the lag screws through the safe's mounting holes into the stud, taking care not to over-torque and split the wood. A lag screw into a stud center can support more than 100 kg of pull-out force in softwood and even more in hardwood, which is more than enough for any hotel safe in the wall-mount category.
Steel-stud drywall. This is the wall type that catches installers out. Steel studs are typically 0.5 to 1.0 mm thick galvanized steel and cannot support lag screws the way wood studs can. The correct anchor for steel studs is a Toggle or Snaptoggle bolt rated for the loaded weight, installed through a hole drilled in the drywall and the stud. The bolt's load rating should be derated by 25 to 50 percent compared to wood-stud ratings because steel studs can deform under sustained load. For safes over 20 kg loaded on steel studs, the safest answer is to downgrade to furniture-mount inside a fixed cabinet.
Hollow partition walls with no stud. This configuration cannot safely support a wall-mounted safe. The drywall facing will shear under sustained load, and any anchor that grips only the drywall will pull out. The two correct responses are to relocate the safe to a position where a stud or solid substrate is available, or to switch to furniture-mount inside a fixed cabinet that is itself anchored to the wall.
Furniture Mount: Safes Inside Closets and Cabinets
Furniture-mount is the installer's friend when the wall cannot carry a wall-mounted safe but the operator still wants the safe out of sight. The safe is mounted inside a wardrobe, closet, or cabinet, typically on a shelf or against the back panel, and bolted through the cabinet into the wall or a structural cross-member behind it. Furniture-mount is the dominant install method in many European and Asian hotel formats where in-room closets are built in.
The mechanics are different from a direct wall mount. The safe does not anchor to the cabinet carcass; it anchors to a structural member that is independent of the cabinet. The cabinet itself must be fixed to the wall or floor independently of the safe, so that an attacker cannot simply tip the cabinet over with the safe inside. The most common configuration is a built-in closet where the rear panel of the closet sits flush against the wall studs; the safe is bolted through the rear panel into the studs behind, with the closet frame carrying no load.
For free-standing wardrobes, the furniture must be anchored to the wall with anti-tip straps or L-brackets before the safe is mounted inside, and the safe must be bolted through the wardrobe back into the wall behind. If the wardrobe is on a raised platform or a hollow base, the floor must be checked for solid substrate before any anchoring is done.
The advantages of furniture-mount are real: it allows safe installation in rooms where the wall type rules out direct wall-mounting, it hides the safe from casual view (which is itself a theft deterrent), and it gives the housekeeping team a single, predictable place to check the safe during room turns. The disadvantages are that the safe is harder to service, the cabinet must be replaced if it is damaged, and the install takes longer than a direct wall mount because of the additional cabinet preparation.
Floor Mount: Heavy Safes and Concrete-Slab Anchoring
Floor-mount is the answer when the safe is too heavy or too large to wall-mount, or when the wall construction cannot accept any kind of wall anchor. Floor-mount requires a concrete slab or a structural timber floor, and it requires drilling through the safe's base into the substrate below. It is the highest-security mounting method because the anchor is loaded in shear rather than tension, and concrete-slab anchors resist pry-bar attacks better than wall anchors.
The most common floor-mount application in hotels is for larger safes — typically in the 25 to 100 kilogram empty weight range, or for laptop-sized safes in executive suites and back-of-house cash-handling rooms. The safe is positioned on the floor in its final location, the mounting holes in the base are marked on the substrate, the safe is set aside, and the holes are drilled with a hammer drill and masonry bit. Wedge anchors or sleeve anchors in M10 or M12, grade 8.8 or higher, are the standard choice. After the anchors are set, the safe is repositioned over the anchors, the washers and nuts are fitted, and the bolts are torqued to the rated value.
Floor-mount cannot be used on a raised floor over a hollow cavity — for example, the access-floor systems common in older hotel data centers and some modern guest-room configurations. In those cases, the safe must be relocated to a slab location, or the raised floor must be locally removed and the slab beneath exposed for anchoring. Always confirm the floor type with the hotel's facilities team before specifying floor-mount.
Floor-mounted safes are the easiest of the three methods to pull-force test because the anchor direction is straight up and a calibrated pull rig can be positioned directly over the safe. The acceptance criterion is typically no movement at 1.5 times the rated anchor load, sustained for 30 seconds.
Post-Install: Pull-Force Test, Code Compliance, and Liability Notes
Installation is not finished when the last bolt is torqued. The post-install verification is what converts a mechanical installation into a defensible record that the hotel can show to an insurer, a fire inspector, or a plaintiff's attorney if something goes wrong.
Pull-force test. Apply a steady hand-pull perpendicular to the mounting surface on each anchor in turn. A well-mounted anchor should show no visible movement, no creaking, and no drywall bulge. For commercial or insurance documentation, a calibrated pull-test rig that measures force to a specific load rating is preferred; many security equipment suppliers and third-party inspection companies offer this as a service. The pull-test result is recorded in the safe's installation log.
Torque check and re-check schedule. Every bolt should be torque-checked at install and re-checked at 30 days and 90 days. Anchor settling, thermal cycling, and minor vibrations from door closures and HVAC can loosen bolts over time, and a 90-day re-check catches most of this drift. Some operators schedule an annual re-check as well, especially in high-turnover properties.
Code compliance. Confirm that the safe location does not conflict with fire-sprinkler coverage, that the safe does not block egress paths, and that the safe is not installed in a fire-rated wall in a way that degrades the wall rating. The NFPA 13 standard on sprinkler systems and the local fire code both apply; coordinate with the hotel's fire-safety officer before installation in any sprinklered area. Insurance carriers may have additional documentation requirements beyond the local fire code.
Liability documentation. The installation log should include the date, the installer name and license number where applicable, the wall or floor type, the anchor type and quantity, the torque values, the pull-test result, and a photograph of the installed safe. This log is the hotel's primary defense if a guest files a property-loss claim and disputes whether the safe was properly installed. The American Hotel & Lodging Association (AHLA) publishes operational guidance that references proper installation documentation, and most major hotel insurance carriers require it.
For operators sourcing from multiple properties or running a multi-brand portfolio, a standardized installation log template that the install contractor fills out per room is the most reliable way to capture this data. The supplier of the safe can usually provide a template based on the safe's specific mounting configuration. Independent testing and certification bodies such as Intertek and UL also publish reference standards for safe anchoring and fire-resistance ratings, which can be useful for operators specifying safes for new-build properties. Trade publications such as Hotels Magazine, Hotel Management, and Skift regularly cover installation best-practice case studies and product launches that benchmark the market. For facility-management and security-operations readers, FacilitiesNet security resources offer additional operator-side context.
Need a hotel safe built for flexible mounting?
TigerKing Safe manufactures electronic and mechanical in-room safes designed for wall-mount, furniture-mount, and floor-mount installation in hotels, serviced apartments, and resorts. The off-white electronic hotel safe with card slot is our most popular mid-size guest-room model, with back-plate pre-drilled for all three mount configurations and keyed-differently for hotel operations. Browse the full wall-mount hotel safes range, or contact our engineering team for installation drawings, anchor specifications, and multi-property rollout templates.
Frequently Asked Questions
What is the safest way to mount a hotel safe?
The safest mount depends on the wall construction. For concrete or solid masonry, expansion-bolt anchors into the wall are the gold standard and resist the highest pull-out force. For drywall on wood studs, lag screws driven into the stud are the strongest option; drywall anchors alone are not adequate for a loaded safe. For drywall on steel studs, Toggle-type or Snaptoggle anchors rated for the loaded weight are required, and wall-mounting into steel studs is often downgraded to a furniture-mount to avoid drywall shear failure. Floor-mounting into concrete slab with wedge anchors is the highest-security option for heavier safes.
Can a hotel safe be installed in a wardrobe or cabinet?
Yes. Furniture-mounting a safe inside a wardrobe, cabinet, or closet is a common hotel installation pattern, especially in European and Asian hotel formats where in-room closet space is built in. The wardrobe or cabinet must be fixed to the wall or floor independently of the safe, the safe must be bolted through the cabinet back into the wall or a structural cross-member behind it, and the cabinet must not be a free-standing piece that could be tipped over by an attacker. The safe itself should never rely solely on the cabinet carcass for its anchor.
Do hotel safes need to be bolted down?
In practice, every hotel safe should be bolted down or otherwise fixed in place. A free-standing safe that weighs less than about 50 kilograms can be carried out of the room by a single attacker in under a minute, which defeats the purpose of the safe entirely. Insurance policies for hotel theft coverage often require the safe to be bolted or fixed; an unbolted safe can void a guest-property claim. Most hotel operators treat bolting as non-negotiable regardless of whether the safe is wall-mounted, furniture-mounted, or floor-mounted.
What anchors should be used in concrete walls?
For hotel safes on concrete or solid masonry walls, use wedge anchors or sleeve anchors in grade 8.8 or higher carbon steel, sized for the safe's mounting holes (commonly M8 or M10). Drill the hole with a hammer drill and a masonry bit sized exactly to the anchor diameter; do not oversize the hole. Set the anchor to the depth specified by the manufacturer and torque to the rated value. Avoid plastic expansion anchors for any safe heavier than about 10 kilograms loaded, and avoid chemical anchors for safes that need to be removable for service.
Can you mount a safe on a hollow drywall wall?
Yes, but only into a structural stud or with a high-load hollow-wall anchor. Standard plastic drywall anchors are not rated for safe loads and will pull out under sustained shear stress. For wood studs, drive lag screws directly into the stud center. For steel studs, use Toggle or Snaptoggle bolts rated for the loaded weight; never rely on the drywall facing alone. If no stud is available at the safe location, either relocate the safe or downgrade to a furniture-mount inside a fixed cabinet.
How heavy should a hotel safe be before floor-mounting?
As a practical rule, safes heavier than 25 kilograms empty, or larger than about 40 liters of internal volume, are usually floor-mounted because wall-mounting the same safe concentrates too much load on a small wall area and risks drywall shear or anchor pull-out. Floor-mounting requires bolting into a concrete slab or structural timber floor; it cannot be done on a raised floor over a hollow cavity. For safes in the 15 to 25 kilogram range, both wall-mount and furniture-mount are viable, and the choice depends on wall type and cabinet availability.
How do you test if a mounted safe is secure?
After installation, perform a pull-force test on each anchor: apply a steady hand-pull perpendicular to the mounting surface and verify there is no visible movement, creaking, or drywall bulge. For commercial or insurance purposes, a calibrated pull-test rig is preferred and can certify the anchor to a specific load rating. Also perform a torque check on every bolt to manufacturer spec, then re-check at 30 days and 90 days because anchor settling and thermal cycling can loosen bolts over time. Document the test results in the safe's installation log for liability protection.
Do hotel safe installations require a permit or licensed contractor?
Requirements vary by jurisdiction. In most U.S. states, installing a hotel safe is treated as routine fixture installation and does not require a dedicated permit, but the contractor must hold a general construction or low-voltage license where one applies. In the EU, fire-rated safe installations in hotels may require coordination with the local fire authority because safe locations affect sprinkler coverage and compartmentation. Insurance carriers often require that installations be performed by a licensed contractor and documented in writing; always check with your insurer and local authority before installation.
James Chen
Senior Security Industry Analyst & SEO Content Strategist at TigerKing Safe (Ningbo Tigerking Security Equipment Co., Ltd.)
James Chen has covered the security equipment manufacturing and global trade sector for over 10 years. His work has been cited in Security Products Magazine and multiple industry procurement guides. He specializes in B2B sourcing strategy, OEM/ODM evaluation frameworks, and market intelligence for physical security products.
Facebook LinkedIn YouTube X (Twitter)